How To Create A Hub Site in SharePoint Online

To Create Hub Site in SharePoint Online follow below steps

Crete SharePoint Site

I have created SharePoint Site URL: https://nrsharepoint.sharepoint.com/sites/Contoso

Now Open SharePoint Online Management Shell and run below commands


Connect-SPOService -Url "https://nrsharepoint-admin.sharepoint.com"    

Make Sure you need to pass admin site url in my case it is “nrsharepoint-admin” while connecting using SPOService

It will ask your Credentials for the site.

Once you are able to login add below powershell commnad to register your given site as Hub Site.


Register-SPOHubSite -Site "https://nrsharepoint.sharepoint.com/sites/Contoso"   

Once you run above command it will ask you Principals[0]: parameter value do not pass anything for that value.

After Successfully execution of commnad it will Convert or Connect Existing Site to Hub Site

SharePoint Framework SPFX On SharePoint Server 2016

To use SharePoint Framework SPFX on SharePoint Server 2016 we need to install SharePoint 2016 Feature Pack 2.

SharePoint 2016 Feature Pack 2 supports SharePoint Framework client-side web parts hosted in classic SharePoint pages.

SharePoint 2016 Feature Pack 2 supports SharePoint Framework client-side web parts hosted on classic SharePoint pages built by using the SharePoint Framework v1.1.0. This means that when you are targeting the SharePoint 2016 platform, you need to use the SharePoint Framework v1.1.0 due to the server-side version dependencies.

Install following prerequisite to develop SharePoint Framework SPFX.

  • Nodejs (Download Link: https://nodejs.org/en/) Make sure you install node version 6.11.2
  • Gulp Version 3.9.1
  • Yeoman Template Generator 2.0.2
  • NPM Version 3.10.10
  • SharePoint Framework Yeoman Generator Version 1.0.2
  • Visual Studio Code or any other editor (Visual Studio Code: https://code.visualstudio.com)

Please make sure that you install Microsoft Template Generator Version 1.0.2 any other version will not work for SharePoint 2016 On Premise.

My Environment:

Installation of Yeoman Template Generator

Installed Package Version

Package Installation Command


npm install -g yo gulp


	npm install npm@3.10.10


npm install -g @microsoft/generator-sharepoint@1.0.2

Create New SPFX Solution using command


yo @microsoft/sharepoint

Give Solution Name, Web Part Name and other required information as shown in Image

Once Solution is created it will appear as shown below

Now let’s make changes in created solution. You can open it using command


code .

Once you enter command it will open in Visual Studio Code Editor.

We are going to update HTML Code in file: HelloSpfxWebPart.ts

You can reach HelloSpfxWebPart.ts file from solution location SPFX\src\webparts\helloSpfx\HelloSpfxWebPart.ts

I have added my name”Nilesh Rathod” in html text/tag.

You can make changes as per your requirement.

Now next task is to test SPFX Solution/WebPart on SharePoint Server environment.

Before that we are going to run command “gulp trust-dev-cert” so that when we run our SPFX webpart on local machine it will not give Certificate Error


gulp trust-dev-cert

After that you can add command “gulp serve” to run this SPFX Solution/WebPart on local environment.

When you run gulp serve command it will open browser with URL: https://localhost:4321/temp/workbench.html which contains modern UI for SharePoint Web Part.

Here you can insert web part as shown in image

Once you add Web Part on Page, it will appear as per our updated changes.

Now we are able to Create and Run Web Part on SharePoint Server 2016 environment.

Next step is to deploy it on SharePoint Server Environment.

Deployment of SPFX WebPart on SharePoint Server 2016

Now when we are going to deploy WebPart on SharePoint Server we also needs to keep on mind that we need to add its related js file or configuration file which is required to run that SPFX application.

When we build our WebPart it will create its configuration file which are required on server to run it without any dependency.

While working with SharePoint Framework WebPart we can assign that location name from where it can read files when we are going to deploy it on any server.

That configuration is called CDN Path which is available in Configuration -> write-manifests.json file.

I have created Document Library named MySPFXFiles on my site location http://sps2012:4444/MySPFXFiles where I can add all required files which will be my CDN Address for SPFX Web Part.

You can set your own document library on your application and can use it as CDN Address.

We can set CDN Path as shown in image

After adding CDN Path let’s ship solution by running command


gulp bundle --ship


This builds the minified assets required to upload to the CDN provider. The –ship indicates the build tool to build for distribution. You should also notice that the output of the build tools indicate the Build Target is SHIP.

Next run command


gulp package-solution --ship

This creates the updated client-side solution package in the sharepoint\solution folder.

Once we run above command it will prepare 2 locations which we needs to consideration for actual deployment on server.

  • One location is “SPFX\sharepoint\solution” where our actual app package file “spfx-soln.sppkg” is generated.
  • Another location is “SPFX\temp\deploy” where all other mandatory file to run SPFX WebPart is generated.

Note that we can easily check or configure “temp\deploy” folder location in solution copy-assets.json file which is location at SPFX\config\copy-assets.json.

Now let’s copy all files on required file from temp\deploy folder to SharePoint Serve.

Open Solution in Folder. You can open it from command prompt also using command

explorer .

Navigate to Temp Deploy Folder Location: SPFX\temp\deploy

Here SharePoint 2016 will not allow to copy JSON file to SharePoint as it is blocked by environment. To enable it please check my post for Allow JSON to SharePoint 2016.

Copy all files and upload into SharePoint CDN Location which we already mentioned in above steps.

In my case it is : http://sps2012:4444/MySPFXFiles

I have copied all files on CDN address as shown in above Image.

Once all required file is copied next step is to deploy app on SharePoint App Catalog

If you are not aware How to Configure SharePoint App Catalog or How to setup App Domain on SharePoint Server you may refer to my post.

SharePoint Server 2016 Configure APP Domain

and

SharePoint Server App Catalog Configuration

Navigate to SPFX\sharepoint\solution location

Now Upload App File spfx-soln.sppkg on SharePoint App Catalog

When you upload package it will ask us to deploy application. You can click on Deploy button and trust application. You may also check your given CDN address is also available on application.

Once you click Deploy, SPFX Solution will deploy on SharePoint Server 2016 you can also check is Deployed Column value as shown in below Image

Once Application is deployed in App Catalog Site it will available in your desired site under Your Application -> Application From your Organization

Click on that app and it will install on server. You can see Installed application as shown in below image

Now you can add SPFX WebPart on any page.

I have created page named SPFXAPP.aspx Edit Page and Click on Insert Web Part Link . You may find SPFX WebPart in “Under Development” section.

Add HelloSPFX WebPart on Page and it will appear as shown in below Image.

Check In and Publish Page.

Hence we learn How to Create SPFX Solution on SharePoint Server 2016 Environment and Deployment Of SharePoint Framework WebPart or Solution on SharePoint Server 2016.

How to Setup App Domain on SharePoint Server 2016

To setup and configure APP Domain On SharePoint Server use below steps.

Open DNS Manager on Server

Find DNS and Open it

Select Forward Lookup Zone

Right Click on Forward Lookup Zone and Click on New Zone

It will start New Zone Wizard

Click on Next

Select Primary Zone

Click On Next

Select Second Option running all DNS server in this domain option

Click Next

Enter Zone Name

Click Next

Select Dynamic Update option Allow Only Secure Update

Click Next

Finish New Wizard.

Click on Finish

It will created newly assigned Forward Lookup Zone: sharepointapps.com

Right Click on sharepointapps.com and click on New Alias (CNAME)

Add New Resource Record

Here Add Alias Name “*” and set Fully Qualified Domain Name (FQDN) by browse file selection and select existing server (same as parent folder) option.

Click OK

Now Lookup Forward Zone is configured here.

Next Step is to Configure SharePoint Service: App Management Service Application

Navigate to SharePoint Central Administration

Click on Application Management -> Manage Service Applications

Create App Management Service

Click New and Select App Management Service

It will create App Management Service as shown in image

Once Application is created run below command to setup

Run the SharePoint 2016 Management Shell as an administrator

Start the SPAdminV4 and SPTimerV4 service applications


net start SPAdminV4
net start SPTimerV4

Also Set the domain used to host apps to the new zone created above


Set-SPAppDomain "sharepointapps.com"

Start the AppManagementServiceInstance and SPSubscriptionSettingsServiceInstance service instances:


Get-SPServiceInstance | where{$_.GetType().Name -eq "AppManagementServiceInstance" -or $_.GetType().Name -eq "SPSubscriptionSettingsServiceInstance"} | Start-SPServiceInstance


Get-SPServiceInstance | where{$_.GetType().Name -eq "AppManagementServiceInstance" -or $_.GetType().Name -eq "SPSubscriptionSettingsServiceInstance"}


Create the SharePoint Subscription Service:

Note that I have used my server “SPS2012” here for SPManagedAccount you can use your own server.


$account = Get-SPManagedAccount "SPS2012"
$appPoolSubSvc = New-SPServiceApplicationPool -Name SettingsServiceAppPool -Account $account
$appPoolAppSvc = New-SPServiceApplicationPool -Name AppServiceAppPool -Account $account
$appSubSvc = New-SPSubscriptionSettingsServiceApplication –ApplicationPool $appPoolSubSvc –Name SettingsServiceApp –DatabaseName SettingsServiceDB
$proxySubSvc = New-SPSubscriptionSettingsServiceApplicationProxy –ServiceApplication $appSubSvc
$appAppSvc = New-SPAppManagementServiceApplication -ApplicationPool $appPoolAppSvc -Name AppServiceApp -DatabaseName AppServiceDB
$proxyAppSvc = New-SPAppManagementServiceApplicationProxy -ServiceApplication $appAppSvc


Set the name for the site subscription:


Set-SPAppSiteSubscriptionName -Name "app" -Confirm:$false


Here App Domain Service for SharePoint is configured successfully.

Now you can use App Service for your developer site or any other site collection.

How to Allow JSON File Format on SharePoint 2016 on Premise

While working with SharePoint Framework Web Part I found that it requires JSON file to publish or add on CDN File address location on SharePoint Server.

SharePoint 2016 or any other on premises version by default block JSON file type. There are few other file types which are also blocked on SharePoint Server.

You may get its detail information on Microsoft Site.

https://support.office.com/en-us/article/Types-of-files-that-cannot-be-added-to-a-list-or-library-30BE234D-E551-4C2A-8DE8-F8546FFBF5B3#ID0EAABAAA=2016

To allow blocked file type on SharePoint Server follow below steps.

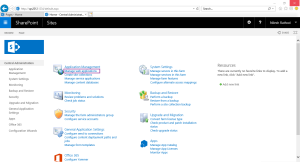
Navigate to: SharePoint Central Administration

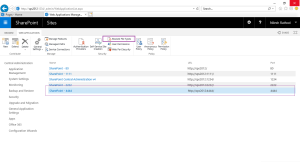
Click on Manage Web Application

Select your desired site on which you want to allow JSON File.

From Ribbon Select or Click on Blocked File Types.

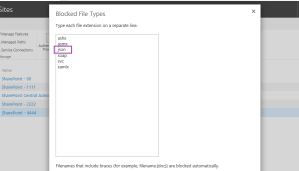
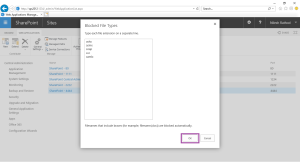
It will open Blocked File Types Modal Dialog Box.

Remove JSON extension from that list and press OK button.

After performing above steps, Now you can upload JSON file on SharePoint Server 2016.

How to remove NodeJS from Windows

Follow below steps to remove NodeJS from your PC/Windows.

Uninstall nodejs from Control Panel->Programs ->Uninstall a Program

Clear all temporary files from below locations:

• C:\Program Files (x86)\Nodejs
• C:\Program Files\Nodejs
• C:\Users\{User}\AppData\Roaming\npm (or %appdata%\npm)
• C:\Users\{User}\AppData\Roaming\npm-cache (or %appdata%\npm-cache)
• C:\Users\{User}\.npmrc (and possibly check for that without the . prefix too)
• C:\Users\{User}\AppData\Local\Temp\npm-*

Also remove if there is any other reference for node.js is available by running command


where node

If you found any other reference than remove it from that location.

Restart your PC once above operation or task is completed.

For more detail Reference URL: https://stackoverflow.com/questions/20711240/how-to-completely-remove-node-js-from-windows

How to render separate HTML file with SPFX WebPart

SPFX WebParts gives us facility to write HTML content in Render() method. Many times if HTML file is large or for our own convenience we want or needs  to create separate HTML file.

To create HTML file we need to create .ts file with HTML content.To use created file we need to add its reference to WebPart file. Web Part file will render its HTML content in browser.

I have created SPFX Solution: SPDesignTest and added webpart SpCustomDesignSpfxWebPart

To add separate html file I created MyCustomHTML.ts file  and added content as shown in below image.


Once HTML file is ready we can access this file in SpCustomDesignSpfxWebPart.ts file by adding its references.

Added reference


/* Reference of MyCustomHTML HTML Content File  */
import objMyCustomHTML from './MyCustomHTML';

/* Load External Bootstrap CSS Reference */
import { SPComponentLoader } from '@microsoft/sp-loader';
SPComponentLoader.loadCss('https://maxcdn.bootstrapcdn.com/bootstrap/4.1.0/css/bootstrap.min.css');

We need to provide its reference to SpCustomDesignSpfxWebPart.ts using variable as shown in below code


public render(): void {
    /* Load HTML From MyCustomHTML.ts file by using its variable templateHTML */
    this.domElement.innerHTML = objMyCustomHTML.templateHTML;
  }

Final SpCustomDesignSpfxWebPart.ts will look as per below image

Now when we run our SPFX Solution using gulp serve we are able to see HTMLas shown in below image

SPFX WebPart TS File Code :

MyCustomHTML.ts


import { escape } from '@microsoft/sp-lodash-subset';
import styles from './SpCustomDesignSpfxWebPart.module.scss';

export default class sample {

	public static templateHTML: string = 
	`
		<div class="container">
		<h2>Custom Form</h2>
		<p>Custom Form in SPFX using Bootstrap 4</p>
		<form>
		<div class="form-group">
			<label for="inputdefault">Name</label>
			<input class="form-control" id="inputdefault" type="text">
		</div>
		<div class="form-group">
			<label for="sel1">Country</label>
			<select class="form-control" id="sel1">
				<option>-Select-</option>
				<option>2</option>
				<option>3</option>
				<option>4</option>
			</select>
		</div>
		<div class="form-group">
			<button type="submit" class="btn btn-default">Submit</button>
		</div>
		</form>
	</div>

	`
	}


SpCustomDesignSpfxWebPart.ts

import { Version } from '@microsoft/sp-core-library';
import {
  BaseClientSideWebPart,
  IPropertyPaneConfiguration,
  PropertyPaneTextField
} from '@microsoft/sp-webpart-base';
import { escape } from '@microsoft/sp-lodash-subset';

import styles from './SpCustomDesignSpfxWebPart.module.scss';
import * as strings from 'SpCustomDesignSpfxWebPartStrings';

export interface ISpCustomDesignSpfxWebPartProps {
  description: string;
}

/* Reference of MyCustomHTML HTML Content File  */
import objMyCustomHTML from './MyCustomHTML';

/* Load External Bootstrap CSS Reference */
import { SPComponentLoader } from '@microsoft/sp-loader';
SPComponentLoader.loadCss('https://maxcdn.bootstrapcdn.com/bootstrap/4.1.0/css/bootstrap.min.css');

export default class SpCustomDesignSpfxWebPart extends BaseClientSideWebPart<ISpCustomDesignSpfxWebPartProps> {

  public render(): void {
    /* Load HTML From MyCustomHTML.ts file by using its variable templateHTML */
    this.domElement.innerHTML = objMyCustomHTML.templateHTML;
  }

  protected get dataVersion(): Version {
    return Version.parse('1.0');
  }

  protected getPropertyPaneConfiguration(): IPropertyPaneConfiguration {
    return {
      pages: [
        {
          header: {
            description: strings.PropertyPaneDescription
          },
          groups: [
            {
              groupName: strings.BasicGroupName,
              groupFields: [
                PropertyPaneTextField('description', {
                  label: strings.DescriptionFieldLabel
                })
              ]
            }
          ]
        }
      ]
    };
  }
}


Deploy SharePoint Framework -SPFX WebPart with CDN

While working with SPFX solution I found that we need CDN address for script and other configuration files to make SPFX web part run independently on SharePoint Site.

We can create CDN on SharePoint Site using PowerShell Scripts. Below scripts includes steps to create CDN on SharePoint Site as well as Deployment of SPFX using CDN.

Steps to Create CDN [Content Delivery Networks] Location On SharePoint Site:

Use SharePoint Online Management PowerShell to run commands or get CDN details for SharePoint Online Site.

I have created Document Library “CustomCDNFiles” which will work as CDN address for files


##Login to SharePoint Online Site 
##Make sute you select admin site . Note that url with admin site contains " -admin "
Connect-SPOService -Url https://nileshspsolutions-admin.sharepoint.com -Credential nilesh@nileshspsolutions.onmicrosoft.com

##Get your current tenant configuration
Get-SPOTenant | fl *cdn*

##Create Private CDN 
Add-SPOTenantCdnOrigin -CdnType Private -OriginUrl sites/Intranet/CustomCDNFiles

##Get Private CDN Value 
Get-SPOTenantCdnOrigins -CdnType Private

For demo purpose I have created Private CDN. You may also create Public CDN using below comands


##Login to SharePoint Online Site 
Connect-SPOService -Url https://nileshspsolutions-admin.sharepoint.com -Credential nilesh@nileshspsolutions.onmicrosoft.com

##Create Public CDN 
Add-SPOTenantCdnOrigin -CdnType Public  -OriginUrl sites/Intranet/CustomCDNFiles

##Get Private CDN Value 
Get-SPOTenantCdnOrigins -CdnType Public 

Above commands will set CDN location on SharePoint Site Location : https://nileshspsolutions.sharepoint.com/sites/Intranet/CustomCDNFiles

I will use this library to store files as CDN address files.

Now Next Task is to create SPFX WebPart. I have created SPFX Webpart and able to run this webpart using gulp serve command. To tun this webpart on SharePoint Site we need to also provices its configuration files on CDN so that it can access it.

Navigate to Config => write-manifests.json File in your SPFX WebPart Solution

Update “cdnBasePath” value using created CDN Value

Also note the location of deploy files from config => copy-assets.json

Here path deployCdnPath is the location where our SPFX files which needs to be migrtates avaiablei after deployment commands.

Above steps include configuration and deploypath location.Next turn is for actual deployment of SPFX

As we are deploying SPFX on Produciton or SharePoint Site we need to use below commnads to Ship SPFX.

SPFX Deployment Commands

gulp bundle --ship 

gulp bundle –ship : This executes a release build of your project by using a dynamic label as the host URL for your assets. This URL is automatically updated based on your tenant CDN settings.

gulp package-solution --ship

package-solution –ship :. This creates an updated sp-design-test.sppkg package on the sharepoint/solution folder.

After solution ship commnad we need to transfer configration fille from deploypath which is “temp/deploy”.

Open your solution folder and Navigate to “temp/deploy” location

Copy all files from deploy Folder to CDN Library . In my case https://nileshspsolutions.sharepoint.com/sites/Intranet/CustomCDNFiles/Forms/AllItems.aspx

Copied to Library

Next Navigate to SharePoint => solution Fodder Where actual SPFX WebPart Package file

Upload sp-design-test.sppkg to your App Catalog and add it into your website

After Upload and added to Page SPFX will run without any dependency to gulp serve or local files.

Please note that I have added HTML design in my SPFX Webpart which is shown in an Image. In your case it may be normal SPFX webpart.